Blog

  • Ubiquiti migration from USG Pro v4 to UDM SE

    Requirements:

    • Ethernet connection to your UDM

    Fresh install instructions:

    1. Connect your new UDM SE Port Wan 1 to a port on USG (Lan side).
    2. Let UDM SE boot up.
    3. From your original USG Pro V4 Drop/forget all Ubiqiuti devices (switches/AP/etc). This will allow you to adopt them
    4. Unplug Ubiquiti devices and plug into UDM SE
    5. Connect your computer/laptop to UDM via ethernet
    6. Adopt old devices
    7. Setup you wifi

    If you don’t forget/drop the original devices, you’re going to need to do a factory reset. Reset button for 10 seconds. On APs, wait for the LED to flash. May want to unplug and plug back in the POE ethernet.

    Switches, just hold down for 10 seconds.

    Remember your old wifi names and passwords. Very simple adoption/setup.

  • phpstorm unable to establish connection with xdebug

    I recently reinstalled PHP, and noticed that xdebug would not work from within phpstorm.

    Getting the message “Connection was not establish”.

    Connection was not established. Cannot start debugger session with ‘Xdebug 3.2.0’

    The way to fix that, was just to ensure that we’re using the proper port.

    Xdebug 3.x, uses port 9003. Where as Xdebug 2.x used 9000.

    To fix this, change your phpStorm preferences for the listening port to 9003.

    PhpStorm -> Settings -> PHP -> debug -> port and set to 9003.

    Debug port: 9003
  • Ubuntu 22.04 LTS (debian) Apache2 http2 + PHP 8.2

    [Updated 2023-07-21]
    Commands to launch and to set up my preferred environment in ubuntu.

    sudo su
    add-apt-repository ppa:ondrej/php --yes
    apt update && apt upgrade -y && apt autoremove -y
    
    # Install all php related components.
    apt install -y php8.2-fpm php8.2 libapache2-mod-php8.2 php8.2-common  php8.2-xml php8.2-xmlrpc php8.2-curl php8.2-gd php8.2-imagick php8.2-cli php8.2-imap php8.2-mbstring php8.2-opcache php8.2-soap php8.2-zip php8.2-intl php8.2-bcmath unzip php8.2-dom apache2 composer libapache2-mod-fcgid certbot python3-certbot-apache 
    
    apt autoremove -y
    

    Optionally to setup ZSH and the Z plugin

    $> sudo apt install -y zsh #optional for ZSH
    $> zsh
    #pick option #2, to setup.
    
    # install Z plugin
    $> curl https://raw.githubusercontent.com/agkozak/zsh-z/master/zsh-z.plugin.zsh > zsh-z.plugin.zsh
    $> echo source ~/zsh-z.plugin.zsh >> .zshrc
    $> source ~/zsh-z.plugin.zsh
    
    #set current user to use zsh as default
    $> sudo chsh -s $(which zsh) $(whoami)

    Setup apache.

    ### SETUP YOUR FQD - fully qualified domain
    $> DOMAIN_NAME=example.com

    Paste below carefully…

    sudo mkdir -p /var/www/$DOMAIN_NAME/public
    cd /var/www/$DOMAIN_NAME
    sudo chown -R $(whoami):www-data .
    
    
    sudo tee /etc/apache2/sites-available/$DOMAIN_NAME.conf << END
    <VirtualHost *:80>
        ServerName $DOMAIN_NAME
        ServerAdmin webmaster@localhost
        DocumentRoot /var/www/$DOMAIN_NAME/public
        ErrorLog \${APACHE_LOG_DIR}/error.log
        CustomLog \${APACHE_LOG_DIR}/access.log combined
    
        Protocols h2 http/1.1
    
    	<Directory /var/www/$DOMAIN_NAME/public>
    		AllowOverride All
    		Order Allow,Deny
    		Allow from All
    		DirectoryIndex index.php
    	</Directory>
    </VirtualHost>
    END
    
    sudo a2dissite 000-default
    sudo a2ensite $DOMAIN_NAME.conf 
    sudo a2dismod php8 #may fail... fine.
    sudo a2dismod php8.0 #may fail... fine.
    sudo a2dismod php8.1 #may fail... fine.
    sudo a2dismod php8.2 #may fail... fine.
    sudo a2dismod mpm_prefork
    sudo a2enmod mpm_event
    sudo a2enmod http2
    sudo a2enmod proxy
    sudo a2enmod proxy_fcgi
    sudo a2enconf php8.2-fpm
    sudo a2enmod rewrite
    sudo systemctl restart apache2

    Probably want to ensure that your DNS settings are working. Run certbot, or put in your SSL certs manually.

    other tidbits of script
    
    ###
    ### WARNING, this command can be dangerous.
    ### REVIEW initial crontab -l first, and only if you know for suer
    ### run the command below, and will populate.
    ### Handy cron stuff... INITIAL install only... REVIEW
    ###
    echo '@daily apt update
    @daily apt autoremove -y' | sudo crontab


    ###
    ### MySQL support for php
    ###
    apt install php8.2-mysql mysql-server php8.2-pdo
    
    
    ###
    ### Postgresl SQL support for php
    ###
    
    apt install php8.2-pgsql
    sudo -i -u postgres
    createuser --interactive
    
    
    ### Postgresql itself
    apt install postgresql postgresql-contrib
    sudo systemctl start postgresql.service
    
    
    ### Restart apache:
    $> sudo systemctl reload apache2
    

    Troubleshooting:

    Ensure the firewall is open to ports 80/443

    apache2.conf:

    SetHandler application/x-httpd-php

  • Linux ssh troubleshooting

    ensure that the home directory of the user is 0700, and all sub files.

    $~> chmod 0700 /home/<USERNAME>"

    other useful commands

    $> ssh-copy-id <user>@<targetSystemAddress> # copies your ssh keys over to the new system
  • PHPStorm and xdebug links

    • phpStorm 2021.3 RC
    • PHP 8.1.0
    • xdebug 3.1.1

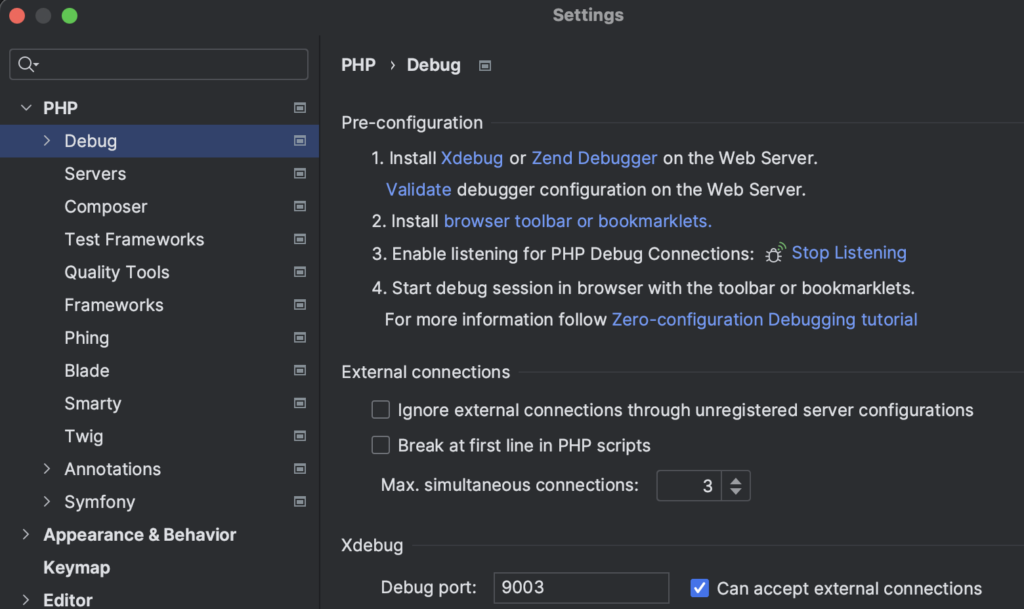
    I enjoy the fact that there’s was the ability to change xdebug.file_link_format parameter in php.ini to allow integration between xdebug messages, and your IDE.

    However, recently, that seems to have broken/changed. The phpstorm:// protocol no longer works.

    After much troubleshooting I have it working for projects that use a framework, such as Symfony.

    You will now need to utilize the framework.yml ide field,

    https://symfony.com/doc/current/reference/configuration/framework.html#ide

    and enter it as follows:

    1. Comment out the xdebug.file_link_format, as that no longer works…
    2. edit: /config/packages/framework.yaml
    framework:
        ide: 'jetbrains://php-storm/navigate/reference?project=%env(resolve:PROJECT_NAME)%&path=%%f:%%l'

    3. edit: /.env ensure that this matches your project name… otherwise jetbrains won’t be able to find the correct session/window.

    PROJECT_NAME="the name of the project"

    4. clear cache, and now your links should work.

    5. restart apache/nginx if required.

    Your Symfony project will allow you to click on filenames (when errors occur) and integrations back to phpStorm.

  • Sending emails with symfony+swiftmail, so that the messages are grouped by conversation

    Easy enough to send emails with Symfony + SymfonyMailer messages out. The issue was once received in a program like Outlook, how do you group them into the same conversation.

    Instead of flooding an inbox with a ton of emails, the emails would be grouped by conversation.

    To accomplish this:

     <?php
    
    // in the __constructor, autowire MailerInterface into $this->mailer
    
    $subject = "something";
    $somethingHashedThatRepresentsThisConversation = "someHash";
    
    $messageId = "[email protected]";
    
           $email = (new Email())->from('[email protected]')
                                  ->to($targetEmail)
                                  ->subject($subject)
                                  ->html($html)
                                  ->text(strip_tags($html));
    
            $headers = $email->getHeaders();
            $headers->addIdHeader('Message-ID', $messageId);  // Original Message ID, I've found reusing it workss.
            $headers->addIdHeader('References', $messageId);  // Original MEssage ID to group by... could add others... I've found that this can reference itself.
    
            $email->setHeaders($headers);
    
    
            $this->mailer->send($email);
    

    There you go.

    PHP 8.0.x, Symfony 5.3

  • Working zero config php xdebug 3.1.1 and phpStorm 2021.3 RC

    php 7.4 w/xdebug 3.0

    phpStorm 2020.3

    zend_extension=”xdebug.so”
    xdebug.mode=debug;
    xdebug.file_link_format=”http://localhost:63342/api/file/%f:%l”

    This now makes xdebug output links that open phpstorm (which is actively listening on port 63342… phpstorm:// wasn’t working for me anymore…

    [UPDATE 2021-01-14]
    zend_extension="xdebug.so"
    xdebug.mode=debug;
    xdebug.file_link_format="phpstorm://open?file=%f&line=%l

    phpStorm 2020.3.1
    php 8.0.1
    xdebug 3.0.1

    [UPDATE 2021-11-29]

    Seems like phpstorm/intelliJ have changed the mechanism, and phpstorm:// protocol no longer works.

    After much troubleshooting I have it working, but for projects that use a framework, such as Symfony.

    You will now need to utilize the framework.yml ide field,

    https://symfony.com/doc/current/reference/configuration/framework.html#ide

    and enter it as follows:

    • phostorm 2021.3 RC
    • PHP 8.1.0
    • xdebug 3.1.1
    1. Comment out the xdebug.file_link_format, as that no longer works…
    2. edit: /config/packages/framework.yaml
    framework:
        ide: 'jetbrains://php-storm/navigate/reference?project=%env(resolve:PROJECT_NAME)%&path=%%f:%%l'

    3. edit: /.env ensure that this matches your project name… otherwise jetbrains won’t be able to find the correct session/window.

    PROJECT_NAME="the name of the project"

    4. clear cache, and now your links should work.

    5. restart apache/nginx if required.

    Now your Symfony project will allow you to edit your files again.

    [Update: 2023-07-12]

    No need for PROJECT_NAME again, or the edit to the framework.yaml file
    1. edit your php.ini file, (or xdebug.ini), to include the line

    xdebug.file_link_format="phpstorm://open?file=%f&amp;line=%l"

    2. restart apache/nginx/php-fpm if required.

  • dnsmasq on pihole for wildcards

    Say you’re a developer and you want all domains that end in “.test” to be redirected to 127.0.0.1

    in the past, we’d edit /etc/hosts file and call it a day.

    But now, with multiple web services, and code that’s shared between multiple sites, we may want something a little more robust.

    DNSMasq to the rescue. I won’t go into details on how to install it, as it’s automatic with pihole.

    I’m using Pi Hole FTL version 5.2. (Date as of writing is 2020-Nov-04)

    1. create a new file called /etc/dnsmasq.d/99-custom.conf

    $> sudo nano /etc/dnsmasq.d/99-custom.conf

    2. The contents of the file should be this single line

    address=/.test/127.0.0.1

    the “.test” is the wildcard notation. 127.0.0.1 is the address you want it to map to.

    3. Restart pihole FTL

    $> sudo service pihole-FTL restart

    Now, on your local machine, ping anything.TEST to make sure it’s working.

  • USB to serial UART interface – use a nodeMCU prototype board to flash a TYWE2S (ESP8285)

    I was trying to flash a TYWE2s chip ESP8285. Bought an FTDI FT232R chip off amazon, two for something like $15… not realizing that I could use a ESP8266 nodeMCU prototype board to do it.

    Such a simple hack. You may not even have noticed that there’s an “EN” pin. Well, there is… look at the pinout for the nodeMCU… when it’s free, the esp8266 is enabled. Short it to ground, and it’s disabled.

    Now that’s the key, disable the chip, but the onboard chipset that helps with prototyping are enabled. So… that means the the TX and RX on the prototype board are still active and available to repurpose.

    So, to flash an ESP8285 (TYWE2S), we’re going to do this:

    • DO NOT PLUG IN THE nodeMCU yet.
    nodeMCUTYWE2S
    TXTX
    RXRX
    3.3V3.3V
    GNDGND
    ENGPIO – 00
    • Now power up the nodeMCU by plugging in the USB.

    If you wired everything correctly, and in the same order for powering up. You’re going to be fine.

    esptool.py will flash the ESP8285 on the TYWE2s chip via the nodeMCU usb serial.

    This procedure should work for the TYWE3S chip as well… but I haven’t tested this. This general procedure will work for all chips…

    NOTE: TX to TX, and RX to RX are not swapped in this case, because we’re hijacking the prototype board… on the board itself, it’s already cross labelled.

    Note1: The LED on the nodeMCU will be disabled.

    Note2: $> esptool.py –port /dev/cu.usbserial-0001 read_flash 0x00000 0x100000 fwbackup.bin

    will backup the firmware currently on the chip.

    Note3: Tasmotizer was used as a GUI to upload the new firmware.

  • Pro’s Con’s of tankless hotwater

    This is “Boots” Economics. — https://www.goodreads.com/quotes/72745-the-reason-that-the-rich-were-so-rich-vimes-reasoned

    Let’s do the math. I was renting a Power Vented 75gal (PV75) tank. It was 13 years old, and rusting out from the inside. No leaks, but bathwater looked like pond water. GROSS. Safe, but gross… needed it replaced. The tank was inspected in February and was going to be replaced/done in March. Covid19 happened, and everything gets put on hold.

    Fast forward to last week… the water’s super gross… tanks accelerated in rusting. eew. Do my research… Navien, Rinnai, Rheem… figure out how many Gal/Min (GPM) of hot water we need, average temperature raise needed, the total cost of ownership over the lifetime of the unit.

    So, I have a fair-sized home and needed something like 6-7 GPM. The average water temperature average is 42°F and needs to be raised to 120°F… meaning a 62°F raise. The unit I picked, could supply 6.5GPM… Navien 240A.

    So… lets do some math. The average life of a tank is between 10-15 years. So, I’m going to say 12.5 years for a tank. Mine just so happened to last ~12.5… Tankless, should last 20-25 years. Lets say 22.5.

    PROsCONs
    Unlimited hot water$$$$ initial upfront cost is expensive
    Environmentally friend (only use energy when needed)Takes time for the hot water to arrive to your tap. (mitigated)
    Recirculation pumps can allow you to have hot water on demand quickerComplex system, with lots that can go wrong.

    Tankless systems are not a new technology, it’s the mainstay way of heating water in Europe and Asia for decades.

    Renting:

    A PV75, was going to cost me ~$1.38/day to rent (with tax). That is with a 7 year contract… that’s not bought out, that’s just renting it. $3,525.90 taxes in. RENTING for 7 years. Renting a tankless, for the size I required, was going to cost ~$2/day.

    Buy: PV75 tank (traditional)

    If you bought a tank, retail price at home depot, PV75 costs around $2047 + HST = $2,313.11. Plus ~$200 labour to hook up. So, that is $201.05/year ownership. Not including gas costs.

    Buy: Navien 240A Tankless

    If you bought a large top of the line tankless, I had quotes for $3500 + materials ($200). That’s $4,181 after taxes, installed. That’s $185.82 per year (22.5 years). BUT, you save on average, $100/year in gas. So that’s $85.82/year, compared to a PV75’s $201.05.

    If you’re willing to put in the effort yourself, you can save a bunch by installing it yourself and hiring a licensed gas fitter to connect the unit. Which brought my yearly costs down significantly. If you’re handy, it’s about a day’s worth of work… 4 hrs, if you have a suitable wall to mount the unit already. I did not.

    Your prices will vary… basically, what I’m saying is… renting is not a good option.